현재 개인적으로 주식 관련 프로젝트를 진행 중인데, 여러 유저들이 동일한 종목의 정보를 조회할 때 발생하는 API 호출의 중복 문제를 해결하기 위해 Redis를 도입했습니다.
문제점
여러 유저가 동일한 종목 정보를 조회하는 경우, 증권사 API를 여러 번 호출해야 하는 상황이 발생할 수 있습니다. 이는 불필요한 트래픽을 유발하고 성능 저하를 초래할 수 있습니다.
- 이를 해결하기 위해 디스크 기반의 DBMS 에 비해 훨씬 빠른 레디스를 도입해보았다.
- 레디스는 인메모리에 모든 데이터를 저장하기 때문에 훨씬 빠르며 여러가지 자료구조를 지원하고 확장성을 고려하였을때도 여러 기능을 제공한다는 점에서 이점이 있다.
- 동일한 종목 요청시 캐시된 데이터를 반환하도록 api 호출을 최적화해보고 최적화 전 후 성능을 비교해보자
Spring Boot + Redis 로 구현하기
Spring Boot 프로젝트에 Redis 셋팅 추가하기
1.Redis 의존성 추가하기
- build.gradle
dependencies {
  ...
	implementation 'org.springframework.boot:spring-boot-starter-data-redis'
	implementation 'com.fasterxml.jackson.datatype:jackson-datatype-jsr310' // LocalDateTime 직렬화 기능 추가


}
2.application.yml 수정하기
- application.yml
#local 환경
spring:
  profiles:
    default: local
  datasource:
    url: jdbc:h2:tcp://localhost/~/mars
    username: sa
    password:
    driver-class-name: org.h2.Driver
  jpa:
    hibernate:
      ddl-auto: create # 테이블 drop 후 자동 생성
    properties:
      hibernate:
        format_sql: true
  data:
    redis:
      host: localhost
      port: 6379

logging:
  level:
    org.springframework.cache: trace # 캐시 로그 남기기
3.Redis 설정 추가하기
@Configuration
public class RedisConfig {

    @Value("${spring.data.redis.host}")
    private String host;

    @Value("${spring.data.redis.port}")
    private int port;

    @Bean
    public LettuceConnectionFactory redisConnectionFactory() {
        // Lettuce 라는 라이브러리를 활용해 Redis 연결을 관리하는 객체를 생성하고
        // Redis 서버에 대한 정보 (host, port) 를 설정한다.
        return new LettuceConnectionFactory(new RedisStandaloneConfiguration(host, port));
    }
}
4. Redis 캐시 매니저(CacheManager) 빈 생성
package com.flab.mars.config;

import com.fasterxml.jackson.databind.ObjectMapper;
import com.fasterxml.jackson.datatype.jsr310.JavaTimeModule;
import com.flab.mars.domain.vo.response.PriceDataVO;
import org.springframework.cache.CacheManager;
import org.springframework.cache.annotation.EnableCaching;
import org.springframework.context.annotation.Bean;
import org.springframework.context.annotation.Configuration;
import org.springframework.data.redis.cache.RedisCacheConfiguration;
import org.springframework.data.redis.cache.RedisCacheManager;
import org.springframework.data.redis.connection.RedisConnectionFactory;
import org.springframework.data.redis.serializer.Jackson2JsonRedisSerializer;
import org.springframework.data.redis.serializer.RedisSerializationContext;
import org.springframework.data.redis.serializer.StringRedisSerializer;
import org.springframework.http.converter.json.Jackson2ObjectMapperBuilder;

import java.time.Duration;

@Configuration
@EnableCaching //  Spring Boot 의 캐싱 설정을 활성화
public class RedisCacheConfig {

    @Bean
    public CacheManager stockPriceCacheManager(RedisConnectionFactory redisConnectionFactory) {

        // ObjectMapper 생성
        ObjectMapper objectMapper = Jackson2ObjectMapperBuilder.json()
                .modules(new JavaTimeModule()) // java 8 날짜/시간 처리 모듈 등록
                .build();


        // Jackson2JsonRedisSerializer 생성시 objecMapper 설정
        RedisCacheConfiguration redisCacheConfiguration = RedisCacheConfiguration
                .defaultCacheConfig()
                // Redis 에 Key 를 저장할 때 String 으로 직렬화(변환) 해서 저장
                .serializeKeysWith(
                        RedisSerializationContext.SerializationPair.fromSerializer(
                                new StringRedisSerializer()))
                // Redis 에 Value 를 저장할때 Json 으로 직렬화(변환) 해서 저장
                .serializeValuesWith(
                        RedisSerializationContext.SerializationPair.fromSerializer(new Jackson2JsonRedisSerializer<>(objectMapper, PriceDataVO.class))
                )
                // 데이터의 만료기간(TTL 설정)
                .entryTtl(Duration.ofMinutes(1L));

        // 레디스 캐시 매니저 생성
        return RedisCacheManager
                .RedisCacheManagerBuilder
                .fromConnectionFactory(redisConnectionFactory)
                .cacheDefaults(redisCacheConfiguration)
                .build();

    }
}
JavaTimeModule 을 추가해서 Java 8 이상의 LocalDateTime 같은 시간 타입을 정상적으로 직렬화(serialize) / 역직렬화(deserialize)할 수 있도록 설정하였다.
- Key 직렬화 방식 → StringRedisSerializer 사용 (문자열 형태로 저장)
- Value 직렬화 방식 → Jackson2JsonRedisSerializer<PriceDataVO> 사용 (JSON 형식으로 저장)
- TTL(Time To Live, 만료 시간) → 1분 (Duration.ofMinutes(1L)) 설정
- RedisCacheManagerBuilder를 사용하여 Redis 기반 캐시 매니저를 생성.
- redisConnectionFactory를 이용해 Redis에 연결.
- 기본 캐시 설정(redisCacheConfiguration) 적용.
5.StockService에 캐싱 로직 추가하기
StockService
@Cacheable(
        cacheNames = "getStockPrice",
        key = "'stock:' + #stockCode + 'time:' + #currentTime", cacheManager = "stockPriceCacheManager"
)
public PriceDataVO getStockPrice(String stockCode, TokenInfoVO tokenInfo, LocalDateTime currentTime) {
    // 등록된 주식만 조회가능
    StockInfoEntity stockInfo = stockInfoRepository.findByStockCode(stockCode).orElseThrow(() -> new IllegalArgumentException("조회할 수 없는 주식 코드입니다 : " + stockCode));

    Optional<PriceDataEntity> priceDataEntity = priceDataRepository.findByStockInfoEntityAndDateTime(stockInfo, currentTime);

      if(priceDataEntity.isPresent()) {
        // DB 에 값이 있는 경우
        return PriceDataVO.toVO(priceDataEntity.get());
    }

    KisStockPriceDto stockPrice = kisClient.getStockPrice(tokenInfo.getAccessToken(), tokenInfo.getAppKey(), tokenInfo.getAppSecret(), stockCode);

    return stockPriceSaver.storeStockPriceWithoutDuplication(stockPrice, stockInfo, currentTime);
}
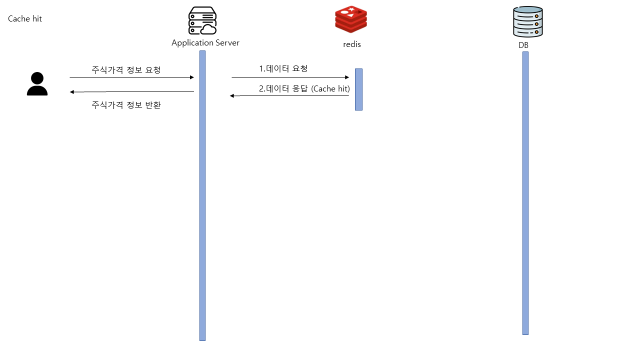
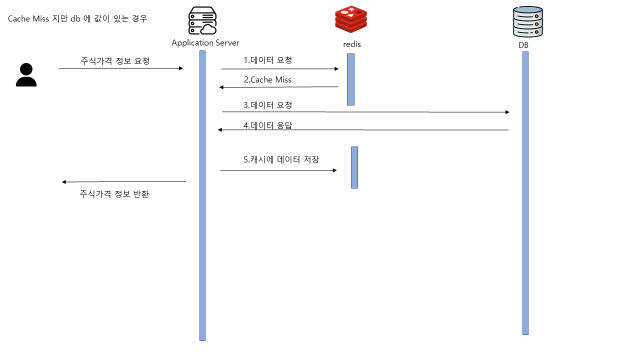
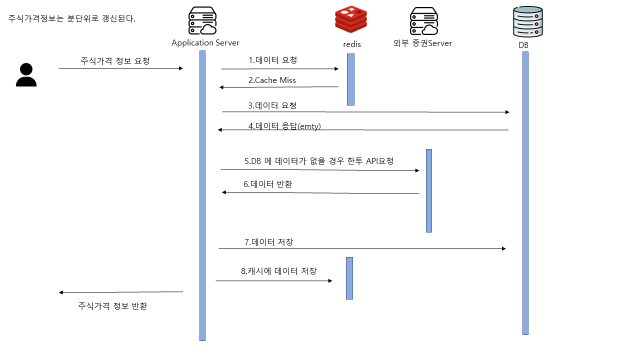
@Cacheable 어노테이션을 붙이면 Cache Aside 전략으로 캐싱이 적용된다. 즉 해당 메서드로 요청이 들어오면 레디스를 확인한 후에 데이터가 있다면 레디스의 데이터를 조회해서 바로 응답한다. 만약 데이터가 없다면 메서드의 내부의 로직을 실행 시킨 뒤에 retrun 값으로 응답한다. 그리고 그 return 값을 레디스에 저장한다.
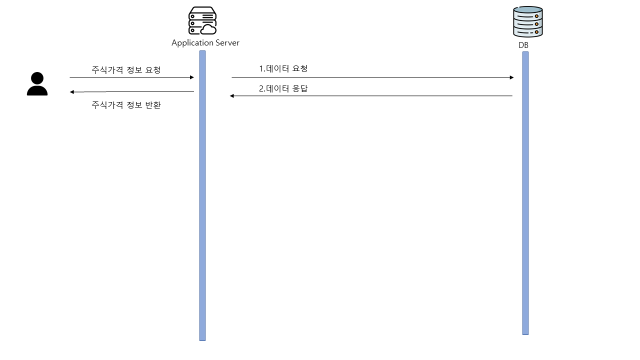
Redis 도입 전후 흐름도 비교
주식 가격 요청 흐름도 (주식 가격 정보는 분 단위로 갱신됨)
레디스 도입 후 흐름도
키 생성 확인
docker exec -it hek-redis redis-cli
127.0.0.1:6379> get getStockPrice::stock:051910time:2025-02-19T12:19
"{\"id\":2,\"stockInfoId\":6,\"currentPrice\":249500,\"openPrice\":238000,\"closePrice\":0,\"highPrice\":249500,\"lowPrice\":238000,\"accumulatedVolume\":208954,\"accumulatedTradeAmount\":51375078500,\"dateTime\":[2025,2,19,12,19]}"
레디스에 접속해보면 키가 잘 생성된것을 확인해 볼 수 있다.
테스트 해보기
Spring Boot 서버를 실행시켜서 API 실행시켜보기
2025-02-19 12:52:03 [http-nio-8080-exec-5] DEBUG n.t.d.l.l.SLF4JQueryLoggingListener -
Name:dataSource, Connection:6, Time:0, Success:True
Type:Prepared, Batch:False, QuerySize:1, BatchSize:0
Query:["insert into price_data (accumulated_trade_amount,accumulated_volume,close_price,current_price,date_time,high_price,low_price,open_price,price_change,price_change_rate,price_change_sign,stock_info_id,id) values (?,?,?,?,?,?,?,?,?,?,?,?,default)"]
Params:[(56182282500,228278,NULL(VARCHAR),247500,2025-02-19 12:52:00.0,249500,238000,238000,8500,3.56,+,6)]
2025-02-19 12:52:03 [http-nio-8080-exec-5] TRACE o.s.c.interceptor.CacheInterceptor - Creating cache entry for key 'stock:051910time:2025-02-19T12:52' in cache(s) [getStockPrice]
Cache가 존재하지 않아서 외부 API 요청 후 DB 로 값을 insert 후 Cache 가 생성되었다는 로그가 찍혀있다.
2025-02-19 12:52:47 [http-nio-8080-exec-4] TRACE o.s.c.interceptor.CacheInterceptor - Computed cache key 'stock:051910time:2025-02-19T12:52' for operation Builder[public com.flab.mars.domain.vo.response.PriceDataVO com.flab.mars.domain.service.StockService.getStockPrice(java.lang.String,com.flab.mars.domain.vo.TokenInfoVO,java.time.LocalDateTime)] caches=[getStockPrice] | key=''stock:' + #stockCode + 'time:' + #currentTime' | keyGenerator='' | cacheManager='stockPriceCacheManager' | cacheResolver='' | condition='' | unless='' | sync='false'
2025-02-19 12:52:47 [http-nio-8080-exec-4] TRACE o.s.c.interceptor.CacheInterceptor - Cache entry for key 'stock:051910time:2025-02-19T12:52' found in cache(s) [getStockPrice]
한번 더 api 요청시 Cache 가 Creating 되지 않고 기본 Cache 를 조회해왔음을 알 수 있다.
성능 비교(K6)
성능 비교를 위해 k6라는 부하테스트 툴을 사용해 서버가 어느 정도의 요청을 견딜 수 있는지 부하테스트를 진행해보자
Throughput : 서비스가 1초당 처리할 수 있는 작업량
주로 TPS (Transaction PerSeconds, 1초당 처리한 트랜잭션 수) 이다.
API에 부하를 주기 위해 k6 스크립트 작성
script.js
import http from 'k6/http';
import { sleep } from 'k6';

export default function () {
    http.get('http://127.0.0.1:8080/api/stock/quotations/inquire-price?stockCode=051910');
}
Redis를 적용하기 전·후 Throughput(처리량) 비교해보기
캐싱을 적용시키기 전의 Throughput 측정
k6 run --vus 30 --duration 30s script.js
- --vus 30 : 가상 유저(Virtual Users)를 30명으로 셋팅 (API 요청을 보내는 사용자가 30명인 것처럼 부하 생성)
- --duration 30s : 30초 동안 테스트를 유지
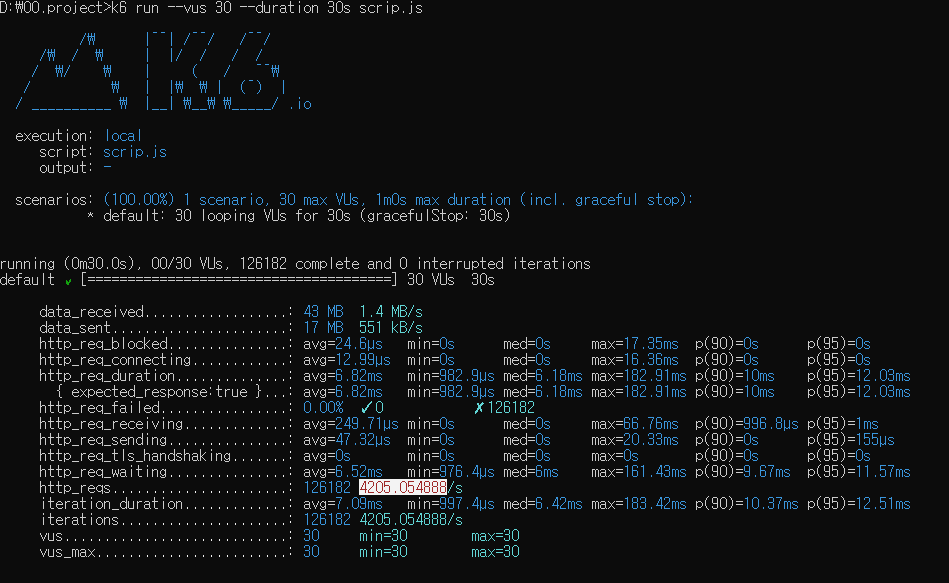
평균적으로 1초에 4천개의 요청을 처리했다는 뜻이다. 현재 구축한 서비스에서 주식 가격 조회 API 의 Throughput 이 4205.05 TPS 이다.
캐싱을 적용시킨 후에 Throughput 측정
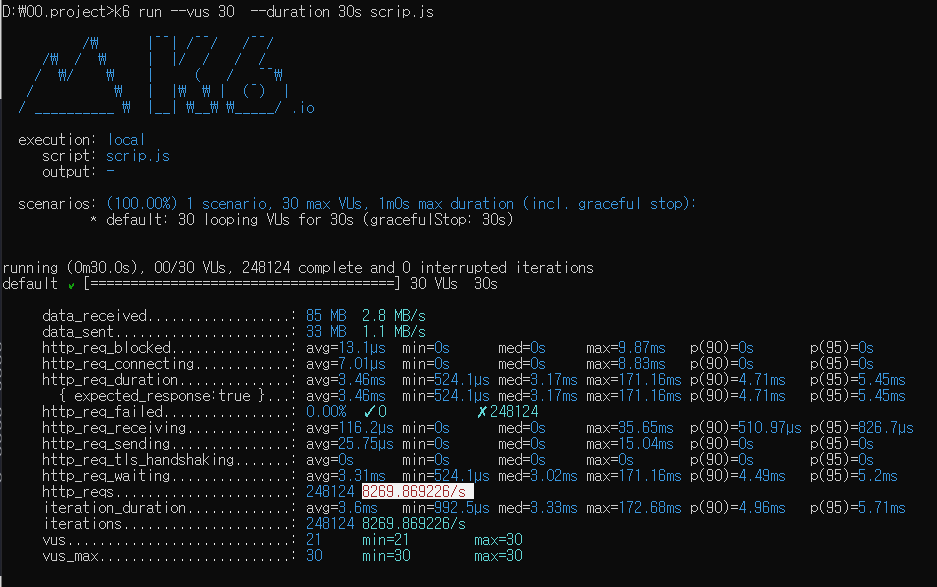
평균적으로 1초에 8천개의 요청을 처리했다는 뜻이다. 현재 구축한 서비스에서 주식 가격 조회 API 의 Throughput 이 8269.8 TPS 이다.
성능이 2배나 상승한 것을 확인할 수 있다.
참고자료 : 비전공자도 이해할 수 있는 Redis 입문/실전 (조회 성능 최적화편)
'Spring' 카테고리의 다른 글
| 모니터링 메트릭 활용 (1) | 2025.03.25 |
|---|---|
| Spring Boot 애플리케이션 실시간 모니터링: Actuator, Prometheus, Grafana 활용법 (0) | 2025.03.19 |
| [스프링 핵심 원리 - 기본편] 의존관계 자동 주입 1 (1) | 2024.11.05 |
| [스프링 핵심 원리 - 기본편] 컴포넌트 스캔 2 (1) | 2024.10.28 |
| [스프링 핵심 원리 - 기본편] 컴포넌트 스캔 1 (2) | 2024.10.18 |